
Plant pest scouting is a systematic monitoring system foundational to an effective integrated pest management plan. Scouting can save a cultivation operation substantial cost and labor by detecting issues before they have caused crop damage. A fully detailed and consistent scouting plan should be developed prior to the first planting and launched alongside production. In startup cultivation facilities, pest problems may not have yet presented themselves, but a preventive approach remains action critical.
As seen in Cannabis Business Times’ March 2022 “State of the Growing Environment” report, pest/disease management was the most-cited cultivation challenge among growers, with 45% of respondents noting this issue as most concerning, up from 37% in 2020.
In grows which have been operational for some period, recurring pest issues may be plaguing production and contributing to considerable crop loss or degradation of flower quality. In situations like these, adding in or refining a scouting program can be the key to offsetting losses and gaining control of your pest pressures.
1. Identify Team and Inform
Establish scouting labor hours based on the time necessary to effectively scan all your plants during one week and determine the people who will fill that role. Identifying a scout lead can streamline training, and information can then be disseminated to technicians. Fortify your team with the information and visual aids necessary to protect your crops both effectively and efficiently, and make sure scouts know exactly what they are looking for.
Scouts first should understand the common cannabis pests: aphids, caterpillars, fungus gnats, thrips, and mites. Caterpillars can be a huge problem in field crops and open greenhouses, but seldom establish in sealed indoor grows; however, the others may make their way inside your grow at a surprisingly rapid rate. Mites can wreak havoc on a crop, and the mites most destructive to cannabis are broad mites, two-spotted spider mites, and hemp russet mites.
While pathogens can be more complicated both to identify and control and, in some cases, may be visually undetectable, the biggest immediate threats tend to be the fungal diseases powdery mildew and botrytis. Fortunately, both can be spotted by trained scouts and potentially treated before they cause catastrophic crop loss.
Root pathogens, plant viruses and viroids also can wreak great havoc and can spread quickly, often through contaminated medium, containers, or tools. These can present as leaf or stem mutations or evidenced by decreased vigor or declining plant health.
Share detailed images of each pest with your scouting team , including the various life stages and information regarding lifecycles, feeding styles, and damage presentations. Train scouts on beneficial mite and insect identification, as these populations must be monitored and protected from pesticide applications. Also share images of eggs, because shape and details can quickly tip off scouts even when pests are not observed. Broad mite eggs, for example, appear to have white polka dots , which make them quite distinguishable from other mite eggs. For diseases, share identifiers as well as conducive conditions and typical presentations. Train your scouts to differentiate between pest eggs and predator eggs.

2. Arm With Appropriate Equipment
Scouts should always carry hand lenses for quick sweeps and microscope cameras for closer looks and capturing images and video (which are often essential to accurate identification). A low-cost microscope camera, which can usually be purchased for $50 or less, is great for day-to-day use and is less costly to replace when damaged. It is advantageous to invest in at least one quality model for capturing high resolution pictures and videos at 20 to 220 times the original size, which can be shared with experts for exact species-specific identification. Costs vary, but wireless models can be found for about $650.
Bang boards —or white and black cards used in brush scouting—should be close at hand. Brush scouting entails shaking branches over or banging them onto the colored cards to knock off pests, after which the scout can identify or trap them for later identification. Provide survey flags or colored tape to quickly mark areas of concern and, if included in your control SOPs (standard operating procedures), a spray bottle of premixed spot spray (an excellent choice is a diluted mineral-oil based suffocant-type pesticide).
A trap container with a tight lid (and which may contain a small amount of isopropyl alcohol to ensure a pest is killed) is great for transporting a pest out of your grow for closer observation. Clean lab coats for each room with disposable shoe covers, or tray bleach washes between rooms, also can help to mitigate the transfer of pests if scouts must move between growing areas.
3. Hunt for Clues
Understanding pest behaviors can be another key to identification. For example, broad mite males often carry the females around on their backs, so that is a clear marker. Some pests prefer a certain part of the plant or medium; we’ve found hemp russet mites and aphids tend to congregate on the tender, growing tips of plants, especially in early flower, so when performing a quick scan, check these locations.
Don’t overlook a scouting protocol for soil-dwelling pests such as root aphids. Invert pots and inspect roots, noting insects that fall away from soil when tapped or disturbed. Fungus gnat larvae can be detected by scoping the top layer of soil. (More details about how to spot and mitigate fungus gnats can be found here.)
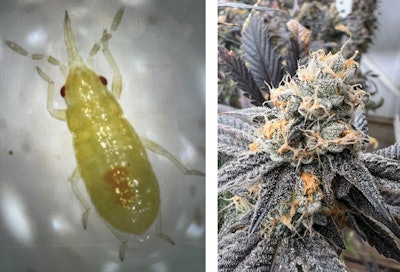
Pest damage is often the first thing found while scouting. Whether it is the stippling of spider mites or the telltale streaks and patches of thrips (see Figure 1, above), leaf damage usually tips off the problem. Honeydew, the thick sap-like excrement of aphids, or their cast skins are sure signs of an infestation.
Diseases like powdery mildew (PM) and botrytis can be fueled by unbalanced environmental conditions. If humidity is too high or rooms experience large swings in humidity, scouts should be on the lookout for disease. Air movement and purification are critical to pest management—particularly disease prevention, but also insect control—and should be closely monitored.
4. Ask for Help to Accurately ID
Accurate identification is critical to creating an effective treatment plan. If you are working with one or more insectaries, most provide great support in the identification of pests. Some insectaries will send a rep to your facility to make in-person analyses, whereas others will provide support via shared photos. If your staff does not have much experience with pest identification, it may make sense to choose at least one trusted insect supplier who will visit the grow, observe the issues, and offer a mitigation strategy.
Many growers turn to the Internet for help with pest identification, but that can be a dangerous place to look for guidance. Internet insect and mite identification images, particularly for cannabis, are notoriously inaccurate. For disease identification, university plant pathology departments offer identification services for cannabis, depending on state regulations. Private labs also test for common cannabis diseases. Be sure to follow instructions for collection of specimens and store and ship properly to avoid sample degradation.
5. Don’t Add to the Problem
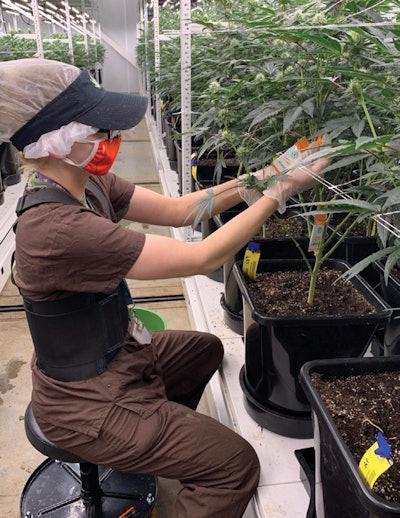
Moving from room to room allows pests to hitchhike on clothing, carts, and tools. If scouts must move between rooms on the same day, have an established order of operations, moving from areas of youngest plants—which ideally should be the cleanest—to areas of oldest. For most grows, this means starting in propagation, working through veg, and then into flower. Mother rooms are best handled on a different day; because though the plants may be older, mother rooms are often smaller than production rooms and it is inadvisable to risk bringing pests into such an important room, where they can be multiplied out during cloning.
There is no question that pests get into indoor grows on personnel and plant material, and management of external contamination points should be an integral part of any IPM plan. Again referencing CBT’s “State of the Growing Environment” report, “67% of respondents attribute external contamination to the pest/disease issues in their operation’s grow.” Tightening up SOPs to eliminate pest contamination points is essential to ease the burden of management.
Establish tight principles for the quarantine and handling of any incoming plant material, and build out a program to control pests which may be walking in with personnel. Consider disallowing employees to maintain hobby grows, as many pests and diseases are cannabis-specific, and it is unlikely that hobby growers are investing the same amount of time and money into IPM. Changing into clean clothes and shoes and adding air showers or clean transition doorways are just some of the ways growers control pests’ entry into a facility. (Editor’s Note: For more information on improving your SOPs for IPM, read DeJesus’ March 2021 article, “Bust Cannabis Pests with These SOPs for IPM.”) Proper air movement is essential to transporting water away from plants to prevent growth of pathogens such as fungus and bacteria. A handheld wind meter, or anemometer, is convenient to measure airflow, and scouts should pay close attention to areas that may not have adequate air movement (wind velocity of generally less than 0.5 meters per second). Dr. Nadia Sabeh of Dr. Greenhouse suggests an air speed target range that depends on stage of growth, with 0.35 m/s for smaller plants up to 1.0 m/s for larger plants.
Proper air filtration prevents pest problems. Assess air filters to make sure they are appropriate for insect control and replace them regularly. Keep in mind that air movement can also transfer pests quickly and over long distances. Air movers and high-velocity fans can effectively carry insects, mites, and disease spores to neighboring areas and multiply out a problem.
6. Remember Record Keeping
Accurate and detailed records are essential to a good scouting program. At a minimum, scouts should have blank scouting report forms and room maps to mark. Be sure to record data noting insect counts, number of insects on sticky cards, and percent of plant or canopy affected. Egg counts should be included in scouting reports to better understand both the problem now, and what is coming next. Check sticky cards with a hand lens or microscope camera to confirm the pest type as some, like fungus gnats and winged aphids, can look extremely similar. Scouts can use a software task platform to assign scouting areas and record observations. Specific scouting software is also available.
Scouting apps can cover pesticide interactions, application tips, photos, and information for pest identification, and appropriate beneficial organisms for management—just confirm the app is backed by a legitimate group. They can also provide detailed information about beneficial insects, such as release methods, suggested concentrations, and how to check for viability. When buying predator eggs, as is often done, for example, with green lacewings, checking for viability may be more involved (i.e., hatching out the eggs in a clean jar with meshed lid for observation). Beneficial insect treatments can have extremely specific application guidelines, such as rolling and tapping the containers, as the quick predators may all move to the top of the container during application. Check with your insect supplier for detailed application instructions and make sure scouts are in the loop.
While it’s important to analyze populations of pests, do the same for predators. Beneficial insect and mite populations need to stay vigorous to keep pests in check. Gather counts of predators and include those in scouting reports. When a shipment of beneficial organisms arrives, scouts should check their viability. If the predators are enclosed in sachets, open one or more from each box and analyze activity with a microscope camera. Predators often travel long distances in extreme shipping conditions and may arrive unhealthy or dead. Take container readings with a laser thermometer because if they are far out of range, you can expect loss. Check for viability in a consistent sample size and remember that predators may need to warm up to become activated.
Consistency is the key to effective scouting and pest prevention. Solidify your scouting schedule and stick to it. Provide ongoing training to staff members on everything from identification, to historic trends, to predator handling, and observation. Monitor populations of both pests and predators over time to see how they function throughout seasons and in different environments. Pay close attention to entry points, and keep in mind that the summer months present the greatest risks for transmission from outdoors. Remember IPM protocols when you are scouting, assessing your problems, and creating an action plan: prevention, identification, containment, and management.


