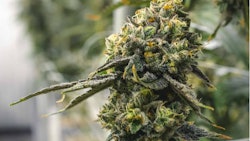
Cannabis clones consist of a small cutting taken from a plant typically in its vegetative stage. This cutting is stuck into a rooting media where it sits for a few weeks until rooted well enough for transplant. When done correctly and transplanted appropriately, clones can be cannabis’s little miracles, saving you thousands on seed money each time you plant a crop.
While techniques and equipment may vary, there are two main approaches to cloning: automated, or by hand.
Here, we explore each process and offer tips and solutions to common rooting and transplanting problems.

Hand-Cloning
Hand-cloning takes more time than using an automated propagation system, but it is a route worth exploring if you want to execute a craft-cannabis approach or cannot afford the upfront automation investment.
Take Clones
The manual cloning process is very simple: Start by identifying the strain you would like to clone, then take “cuts” from the chosen plant or plants. Each cut should be 6 to 8 inches in length. Try to cut the clone as close to the node of the stem (where the targeted cut meets the branch it’s connected to) as possible—this will help the plant heal more quickly and be less susceptible to disease in the future.
Take all the cuts you need to fill your tray and stick them in cups of water so they do not wilt. It is important to minimize the amount of time the cuttings are exposed to air. The quicker you are able to stop the stem from absorbing air, then the better your clones will fare. In addition to having a pH level of around 5.5, the water you put them in can also include some sort of nutrient or cloning solution to help aid in the cloning process. Having the nutrients available from the second the clones are cut helps improves survival rate as the clone can uptake nutrients despite the absence of the mother’s root system. Once you have collected all your clones, you can store them in a fridge while you prep your tray.
Prepare Your Rooting Tray
Most rooting media trays have what are called dibble holes, which are predrilled holes for you to stick the cuttings in. If the trays do not come with dibbles, you may want to make a small hole beforehand so you do not bend the cuttings.
Prior to sticking your clones in your rooting tray, the tray should be very moist but not soaking wet. If it is dry, the media may draw moisture from your cutting, reducing your rooting success odds. The tray can be saturated with a nutrient or cloning solution in addition to water to aid in the rooting process. The cutting will have some nutrients stored in its leaves, so very little additional nutrition will be needed. That said, mycorrhizae or beneficial bacteria can be used to boost the odds of successful rooting.
Stick Your Clones
Once your tray is wet, grab your clones and, one by one, begin to cut the fan leaves off the cutting. Keep the top leaves along with the next two nodes below it (minus the fan leaves). Then, cut a 45-degree angle into the bottom of the cutting, leaving it between 3 to 6 inches tall, and stick the clone in the rooting media.
While you are sticking your clones, it is best to try to leave them soaking in the cup as long as possible. You may also want to use a spray bottle with your cloning solution to treat the cuttings that are in the tray to prevent wilting.
Close the Dome
Finally, after the clones are in the tray and are moist, you can put a dome on top of the tray and begin the rooting process. With the domes on, keep the humidity high for the first few days and then dial it down after the first week. Keep the rooting media moist and add nutrients for the developing roots to start absorbing after the first week. Minimize the lighting intensity above the clones.
After 14 to 21 days, white roots should begin to form as long as the clones become small plants. Once roots are nice and pronounced and clones begin to grow again, then you can transplant the new plant (more on that later).

Manual Transplant
Check and Prep Your Rooting Trays
The manual transplanting process begins with selecting your tray of clones. Make sure they have healthy roots by tugging on a few of them and checking the roots underneath the growing medium. If roots are just poking out from the bottom, the tray is not ready. If roots are prevalent, plant as soon as possible. The goal is to avoid roots circling around the bottom of the tray and becoming rootbound, as this will stress the new plants out.
Be sure that each clone’s rooting media is wet before transplanting into another pot. The plant will draw all the water from that cube before drawing water from the new soil around it for the first couple of days, so be sure to keep it wet.
Re-Pot Your Clones
After checking for healthy roots, plant each clone in a pot that is 2 gallons or less in volume. While this is a good size for initial transplant, a larger pot can be used. While transplanting into a larger pot will increase rooting times, it also means you will have a longer period of time before the plant needs to be transplanted into a larger pot (if at all).
Place each clone into the pot with about an inch of soil covering the clone base. If they are abnormally large, they can go a little deeper into the soil, but never against the bottom of the pot. Roots tend to grow downward, so placing them on the bottom makes it difficult for them to establish a great root base. Once you have placed your tray in the pots or before the end of the day, water the new transplants well so that the soil is wet throughout the pot. They should establish roots within a few days as long as they are not over- or under-watered. Depending on if your soil has nutrients in it already or not, make sure they are being fed immediately to avoid deficient growth.

Automated cloning
A very good crop can be produced using automation, and propagation is often one of the first places cultivation companies start automating because of the proven success and labor hours a company can save in one cycle alone.
Select and Prep Your Cuttings
First, begin by taking cuttings of the selected cultivar. Clean them for the automated clone planter by taking off the lower fan leaves and cutting the bottom at a 45-degree angle to make the clone reach 3 to 6 inches in length. Then, load your cuttings in the machine or place them in cups with water for short-term storage. (Adding a cloning solution to the storage cup is still recommended.)
Turn on the Machine
Make sure the clone trays are loaded in the autoplanter and turn the machine on. The machine will fill and moisten the tray. Then, take the loaded tray and place the clones under your automated propagation area.
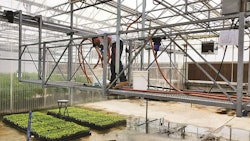
Some automated propagation systems are set up with misters to add humidity; others have a boom with which you can spray water or nutrients from above. Make sure the misters or boom are set up for the new crop and place the tray in the appropriate area. Your automated misting schedule may need to be adjusted after a few days to start to harden off the clones, which will begin the rooting process. Typically after the first week, nutrients are introduced and light intensity can increase. After 14 to 21 days, strong roots will appear, and you can begin to transplant the new plants.
As with cloning, transplanting clones can be a totally automated process.

Automated Transplant
Automated clone transplanting requires much less human labor at many times the speed, but typically costs much more upfront.
Select your tray just as you would for the manual process, and once trays are healthy, load them in the transplanter, along with pots and soil. The transplanter will move the transplants onto a conveyor that could be fed to your tables or vegetative area. Water and nutrients can be introduced by the transplanter, as well. After a few days, roots will establish, and the vegetative process will begin.
With financing becoming more available for cannabis growers in the coming years, automation likely will be the way most cannabis is produced in the future (with the exception of craft farms who will hold a share of the marketplace). That said, machines break every day, so having protocols in place to hand-clone can save days, if not weeks, of delays.